Powerwhell – Using the Help Subsystem

Updating PowerShell v3 Help

We can update the help system from Microsoft it self or from a share or drive in the case the machine does not have access to the internet. Windows 8 and Windows 2012 come with no PowerShell help files as does a install of PowerShell v3 on a Windows 7, 2008 or 2008 R2 system so the first step we have to take is to run the Get-Help cmdlet to update our help files if our system has internet connection. Things to consider when running the Get-Help cmdlet for updating the help files from the internet:


  • To update the help files the account you run the command from must be part of the Local Administrators group and it must be ran from a PowerShell console running as elevated privileges.
  • It will use the Proxy settings configured on Internet Explorer.
  • If the proxy requires NTLM, negotiate, or Kerberos-based authentication the –UseDefaultCredentials parameter must be used so ad to use the current user credentials to authenticate with the proxy.
  • We can only update the help files once every 24 hours  if we want to update inside the 24 hours we would have to use the –Force parameter.
    When it executes it will perform the following actions:
  • Determines which modules support Updatable Help.
  • Finds the Internet location where each module stores its Updatable Help files.
  • Compares the help files for each module on your computer to the newest help files that are available for each module.
  • Downloads the new files from the Internet.
  • Unwraps the help file package.
  • Verifies that the files are valid help files.
  • Installs the help files in the language-specific subdirectory of the module directory.
    We can also update from a share in the network or from a location on the computer (USB Stick, External Hard Drive..) for those hosts that we decided to limit the risk of data exfiltration by not permitting them access to the internet or the machines are isolated for other reasons. So lets cover how this would be done:
  • We start by downloading from a machines that has internet access to a local folder or file share the machine has access to.
    Save-HelpDestinationPath \\fps1.acmelabs.com\resources\PSv3Help
  • We can move the files to a USB Drive or Share  and them from the host that we want to update the help files we specify the –SourcePath and the path to where the files are located
    Update-HelpSourcePath \\fps1.acmelabs.com\resources\PSv3Help
    We can configure a scheduled task to update each day the PowerShell help files either from the internet or from a share as in the example above:
    Register-ScheduledJob -Name UpdatePSHelp `
    -ScheduledJobOption @{RunElevated=$true} ` -ScriptBlock {Update-Help -Force -Verbose} ` -Trigger @{At='6:00 AM';Frequency='Daily'}
    We can take a look at the output of the scheduled jobs with:
    Get-Job -Name UpdateHelp | Receive-Job 
    Now if you are using PowerShell v2 and you also want the latest help information you can use the –Online parameter and this will open Internet Explorer to the page with the latest information you requested.

    Using Get-Help

    We use the Get-Help cmdlet displays information about Windows PowerShell concepts and commands, including cmdlets, functions, CIM commands, workflows, providers, aliases and scripts.
    The cmdlet has also an Aliases set in the shell by default as help and man. It can be used in either of two ways, the first one to search for help information across the entire help with the use of wildcards. help <wildcard expression> will look for the word or expression in the titles of the help files, if none is found it will look in the content of the help for it. We can also limit to what type of information we may want with the –Category parameter
      help -Category Cmdlet -Name *service*
    The cmdlet can also be ran against a specific cmdlets, functions, CIM commands, workflows, providers, aliases or scripts. Wen used against a cmdlet with no options it will show Name, Synopsis, Syntax, Description, Related Links and Remarks. One can select what parts of a help file we want to see by specifying the parameter for the level of information one wants
    • –Detailed parameter is given it will show Parameter information and Examples.
    •  –Full parameter is given it will show a more detailed list of info for Parameters.
    • –Examples parameter is given only examples are shown.
    A cmdlet can have more than one way for it to be invoked and this can be seen in the syntax. They will typically have one or more Parameter Sets that will differ from syntax to syntax.
    image

  • Powershell - The Environment

    What is PowerShell

    PowerShell is Microsoft new Command Line Interface for Windows systems, it provides access to:
    • Existing Windows Command Line tools.
    • PowerShell Cmdlets (PowerShell own Commands)
    • PowerShell Functions
    • Access to the .Net Framework API
    • Access to WMI (Windows Management Instrumentation
    • Access to Windows COM (Component Object Model)
    • Access to function in Windows DLL (Dynamic Linked Libraries)
    As it can be seen PowerShell does provide a lot of access to different technologies and APIs on a Windows system making it ideal for administration and for security work alike.
    Microsoft if making PowerShell the default management interface for many of it’s server products like Exchange, System Center Operations Manager, SQL Server, SharePoint Server and more, not only that but with Windows 2012 server the default install is core (GUI-Less System) and management is done via the command line or using Remote Admiration Tools. Microsoft included over 4 thousand new PowerShell cmdlets to make the administration of the new server the easiest ever using the command line.

    PowerShell

    Depending on the environment and systems you work with there are 2 main versions of PowerShell you will fond your self working with:
    • PowerShell v2 –Included with Windows 7 and Windows 2008 R2. Available as a separate download for Windows XP SP3, Windows 2003 SP2, Windows Vista SP1 and Windows 2008 SP2. It can be pushed to hosts via Windows Server Update Service. Download t http://support.microsoft.com/kb/968929
    • PowerShell v3 – Included with Windows 8 and Windows 2012. Available as a separate download for Windows 7 SP1 and Windows 2008 R2 SP2. It can not be pushed to hosts via Windows Server Update Service. Download http://www.microsoft.com/en-us/download/details.aspx?id=34595
    On Windows System prior to Windows 8 and Windows 2012 PowerShell can be found under Start –> All Programs –> Accessories –> System Tools Depending on the architecture of the operating system there will be an x86 version and a x64 version of PowerShell. In addition to the shortcut to the PowerShell terminal there will also be shortcuts to the ISE (Integrated Scripting Environment) and Editor for PowerShell scripts that was included with PowerShell v2 and greatly improved on PowerShell v3. On Systems running Windows 8 and Windows 2012 with the Metro Interface one just need to type PowerShell or PowerShell_ISE to access the components. On a Windows 2012 Core System one just needs to type powershell.exe in the command prompt to load it.
    Some recommendations when loading PowerShell:
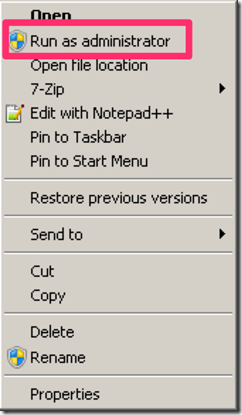
    • Since PowerShell provides access to many administrative functions it is recommended to run it as Administrator.
    image

    image
    • If you are on a x64 system make sure you run the x64 version of it (The one with no x86 in the name of the shortcut)
     image
    When we launch PowerShell we are greeted with a blue command window with white text.
    image
    As it an be seen one can easily determine by looking at the title bar of the window if one is running as Administrator or not.
    I would recommend to take the chance and customize the shortcut for launching PowerShell so as to provide the best experience. Right click on the PowerShell blue icon on the top left of the PowerShell Window and select Properties, make sure on the Options tab that the Edit Options are selected
    image
    On the Layout tab adjust the Screen Buffer Size Width to one where there is no need for side scroll bar making sure that both Width fields have the same value in both the Buffer Size and Window Size.
    image
    Ensuring a proper with will make the management of large amounts of output generated by some cmdlets easier to look at on the screen.
    The terminal has several keyboard shortcuts that can be used, a list of the most common are in the table bellow:
    image

    On PowerShell v2 the ISE can also be use as an interactive command prompt where commands are entered in on window and output is shown in the next, in addition it is is a script editor with syntax highlighting
    image
    On PowerShell v3 the ISE has been greatly improved, offering a consolidated command prompt and also provides a cmdlet help pane
    image
    In addition ISEv3 also provides:
    • Intellisense for Cmdlets and parameters with parameter help popup.
    • Intellisense will provide values for parameters based on enumerations and pre-defined sets.
    • Intellisense will perform smart matching for cmdlet names
    • Intellisense will show path options for filesystems and PSProviders
    • Intellisense will show variables
    • Intellisense will show for objects properties and methods available
    It will also provide an Icon Reference that makes it easier to select in Intellisense what one wants to choose.
    image
    The command prompt on ISEv3 can be said to be the closest one can get to the perfect terminal for PowerShell with the exception that since it is not a true terminal several console commands are not supported. To get a list of the unsupported console commands one can take a look at the $psUnsupportedConsoleApplications variable
    image